|
To enable SAML:
| 1. | On the LCMS Home screen, click the Application Preferences link to open the Application Preferences screen. |
| 2. | On the Application Preferences screen, click the SAML tab from the Components menu to open the SAML pane. |
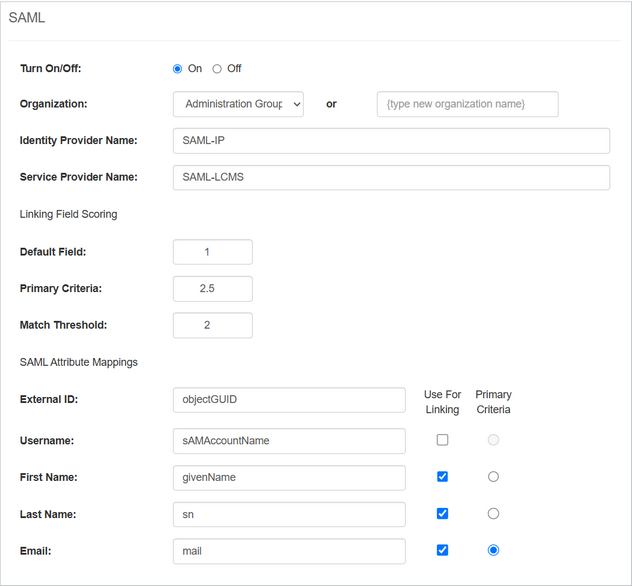
| 3. | On the SAML pane, click the On radio button from the Turn On/Off field. The default for this field is Off. |
| 4. | Select the desired default organization from the Organization drop-down menu or enter a new organization in the Name field. |
| 5. | Enter the desired identity provider in the Identity Provider Name field, if required. Note: This is a custom field used to override the default Identity Provider (SAML-IP) configured in ColdFusion. If multiple Identity Providers are configured in ColdFusion, enter the desired identity provider in the Identity Provider Name field. Leave this field blank if the default is to be used. |
| 6. | Enter the desired service provider in the Service Provider Name field, if required. Note: This is a custom field used to override the default Service Provider (SAML-LCMS) configured in ColdFusion. If multiple LCMS Service Providers are configured in ColdFusion, enter the desired service provider in the Service Provider Name field. Leave this field blank if the default is to be used. |
| 7. | On the SAML Attributes Mappings pane, select the desired attribute(s). Click the Use For Linking checkbox when the attribute is to be used for linking user accounts. Click the Primary Criteria radio button when the attribute is to be used as the primary criteria. Note: These SAML attribute mapping fields will be used to compare and then score existing unlinked LCMS user accounts. The unlinked LCMS user account that matches on the most number of criteria will be linked to the SSO user account. |
| 4. | Click the  button to save the changes or click the button to save the changes or click the  button to return to the previous screen without saving. button to return to the previous screen without saving. |
|