|
This feature allows Administrators to view the list of scheduled tasks that will run in the LCMS (i.e. LDAP user imports, review reminders and batch exports). Admin may also create tasks to clean up project files on the server.
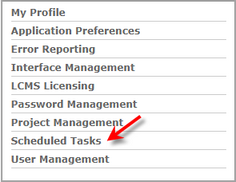
| 1. | On the LCMS Home screen, click the Scheduled Tasks link to open the Scheduled Tasks screen. |

| 2. | On the Scheduled Tasks screen, click the Schedule New Disk Cleanup button to open the Schedule New Disk Cleanup window. Note: On the scheduled task list you may also pause the task, run the task now or edit the task by clicking the corresponding icon. |

| 3. | On the Schedule New Disk Cleanup window, enter the desired name for the cleanup task in the Name field. |
| 4. | Select the desired projects from the Projects drop-down menu. By default all projects are selected. Click the corresponding checkbox to deselect the project. |
| 5. | Select the desired date range (start/end) required for the report from the Start Date/End Date fields. Click each field and select the desired date from the calendar widget. Note: If an end date is not selected for the scheduled task, the end date will be set to indefinitely. |
| 6. | Click the Log Results checkbox to log the results of the task, if required. |

| 7. | Select the desired frequency (once, daily, weekly or monthly) to run the scheduled task by clicking the corresponding radio button in the Frequency field. |
| 8. | Select the desired start time to run the scheduled task from the time widget in Start Time field. |
| 9. | Enter the desired email address in the Email field, if required. Note: The recipient will receive the notifications related to this scheduled task. Multiple email addresses may be entered separated by a comma. |

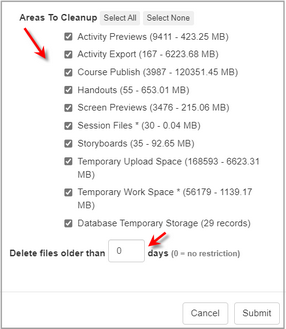
| 10. | On the Areas To Cleanup pane, click the corresponding checkbox to deselect the options that are not required for the scheduled cleanup task. Note: You may use the Select None button to deselect all the options at the same time. You may also click the Select All button to select all the options at the same time. All options are selected by default. Note: The number of associated files and overall size of the associated files are also listed with each option. |
| 11. | Enter the desired number of days in the Delete files older then (XX) days field or leave it set to zero for no restrictions. Note: This field only applies to the Activity Export, Activity Session Metadata, Course Publish and Session Files options. If zero days is entered for the Session Files options the default of one day is used. If zero days is entered for the Activity Session Metadata, only items that are at least one day old will be deleted, so that users currently logged in are not affected. |

| 12. | Click the Submit button to schedule the cleanup task and return to the previous screen or click the Cancel button return to the previous screen. |
|