| 1. | On the Application Preferences page, click E-Mail from the Components menu. |
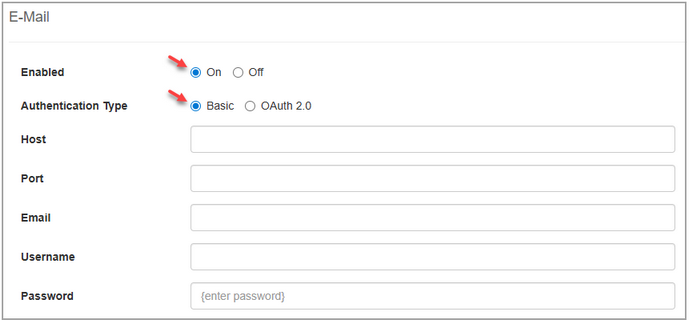
| 2. | On the Enabled field, click the On radio button to enable the private email server. By default this is set to off. |
| 3. | On the Authentication Type select Basic for the authentication type. Note: Select Basic to use a username/password combination to authenticate the email client. For a more secure authentication select OAuth 2.0. See OAuth 2.0 Email Authentication for more information. |
| 4. | Enter the desired port number used to connect to the private email server in the Port field. Note: Common ports: 25=SMTP, 465=SMTP over SSL and 587=SMTP with STARTTLS. |
| 5. | Enter the desired host name or IP address in the Host field. Note: The email client will connect to the IP address or host name entered in this field to send emails. |
| 6. | Enter the desired email address (sender) in the Email field. Note: This address will display as the From email address of sent emails. |
| 7. | Enter the desired authentication username in the Username field. Note: This username will be used to authenticate the private email server. Typically the username and email address are the same. They may be different based on the required configuration. |
| 8. | Enter the desired password for the authentication username in the Password field. Note: This password will be used to authenticate the private email server. Click the Test E-Mail Configuration button to test the configuration (if required). |
|