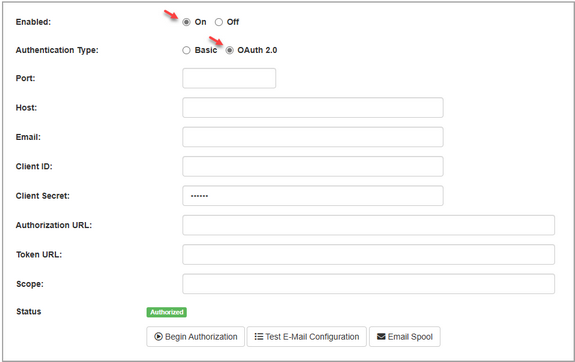
| 1. | On the Application Preferences page, click E-Mail from the Components menu. |
| 2. | On the Enabled field, click the On radio button to enable the private email server. By default this is set to off. |
| 3. | On the Authentication Type select OAuth 2.0 for the authentication type. Note: Select Basic to use a username/password combination to authenticate the email client. See Basic Email Authentication for more information. |
| 4. | Enter the desired port number used to connect to the private email server in the Port field. Note: Common ports: 25=SMTP, 465=SMTP over SSL and 587=SMTP with STARTTLS. |
| 5. | Enter the desired host name or IP address in the Host field. Note: The email client will connect to the IP address or host name entered in this field to send emails. |
| 6. | Enter the desired email address (sender) in the Email field. Note: This address will display as the From email address of sent emails. |
| 7. | Enter the Client ID provided by the OAuth 2.0 service in the Client ID field. Note: The Client ID is the unique identifier provided by the OAuth 2.0 service when the application is registered. The Client ID and Client Secret are the credentials used to identify the installed application during the OAuth 2.0 server authentication. |
| 8. | Enter the Client Secret provided by the OAuth 2.0 service in the Client Secret field. Note: The Client Secret is a unique key that is also provided by the OAuth 2.0 service when the application is registered. |
| 9. | Enter the authorization URL provided by the OAuth 2.0 service in the Authorization URL field. Note: Users will be redirected to this URL and prompted to log in to access their email account. |
| 10. | Enter the token URL provided by the OAuth 2.0 service in the Token URL field. Note: The URL entered in this field will be used by the application to exchange the authorization code for an access token. |
| 11. | Enter the desired scopes (permissions) in the Scope field. Note: Scopes define the level of access the application has to the user's email account (i.e., https://outlook.office365.com/SMTP.Send). |
| 12. | Click the Begin Authorization button to connect to the OAuth 2.0 service using the OAuth 2.0 configured settings. Note: The Status field will display the authorization status. |
| 13. | Click the Test E-Mail Configuration button to test the configuration settings (if required). |
|