|
The Custom Logic tab allows the Administrator to customize the behaviour of the desired interface (viewer).
| 1. | On the interface Edit window, click the Custom Logic tab to configure the interface (viewer). |
| 2. | Click the corresponding button to set the defaults globally or by activity type. |

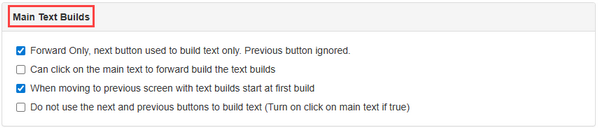
| 3. | On the Main Text Builds pane, click the corresponding checkbox to enable the desired options. Note: These options control how the text options are displayed in the interface (viewer). |
Option
|
Description
|
Forward Only, Next button used to build text only. Previous button ignored.
|
When this option is enabled, the user will be able to use only the Next button to navigate to the next text build(s). Inputs from the Previous button will be ignored.
|
Can click on the main text to forward build the text builds
|
On a screen with multiple text builds, when this option is enabled, the user will be able to click the Main Text field to navigate to the next text build(s).
When this option is disabled, the user will click the Next button to navigate to the next text build(s).
|
When moving to previous screen with text builds start at first build
|
When this option is enabled, if the user returns to a previous screen with text builds, the text builds will reset, and only the first text build will display.
When this option is disabled, if the user returns to the previous screen, the text builds will be in the same state they were left in prior to leaving the screen (i.e. if all text builds were revealed, they will all be visible when the screen is revisited).
|
Do not use the next or previous buttons to build text (Turn on click on main text if true)
|
When this option is enabled, the user will be able to navigate to the next text build(s) by clicking the Main Text field only. Inputs from the Next or Previous buttons will be ignored. Note: Can click on the main text to forward build the text builds must also be enabled for this option to work.
|
| 4. | On the Media pane, click the Hide Media Assets checkbox to enable this option. Note: When this option is enabled, media assets will not display in the interface (viewer). Only the media descriptions will be displayed. This is useful when the interface (viewer) is to be used for creating storyboards and other outline documents. |

| 5. | On the Navigation pane, click the Forward Only Direction, Allow Previous Button checkbox to enable the option. Note: This option controls the interface (viewer) navigation. When Forward Only is enabled in the activity profile, the user will be able to access previous screens in the interface (viewer). When disabled, the user will not be able to access previous screens in the interface (viewer). |

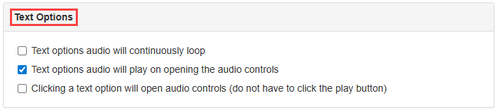
| 6. | On the Text Options pane, click the corresponding checkbox to enable the desired options. Note: These options control the text option audio on Question screens. |
Option
|
Description
|
Text options audio will continuously loop
|
When this option is enabled, the text option audio on a text option will continuously loop until the user navigates to the next text option or screen.
|
Text options audio will play on opening the audio controls
|
When this option is enabled, the audio associated with the text option will play when the text option audio controls are opened.
|
Clicking a text option will open audio controls (do not have to click the play button)
|
When this option is enabled, the audio controls will open automatically when the text option is selected.
Note: If the Text options audio will play on opening the audio controls option is also enabled, the audio associated with the text option will play automatically when the text option is selected.
|
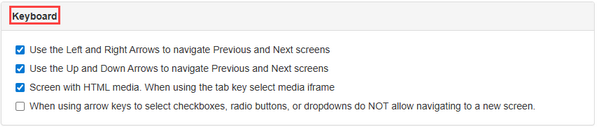
| 7. | On the Keyboard pane, click the corresponding checkbox to enable the desired options. Note: These options control the interface (viewer) keyboard shortcuts. |
Option
|
Description
|
Use the Left and Right Arrows to navigate Previous and Next screens
|
When this option is enabled, the user will be able to use the left and right arrows to navigate to previous or next screens.
|
Use the Up and Down Arrows to navigate Previous and Next screens
|
When this option is enabled, the user will be able to use the up and down arrows to navigate to previous or next screens.
|
Screen with HTML, media. When using the tab key select media iframe
|
When this option is enabled, the user will be able to use the Tab key, on a screen with HTML media, to change the focus to the HTML media frame.
|
When using arrow keys to select checkboxes, radio buttons, or dropdowns do NOT allow navigating to a new screen.
|
When this option and the Use the Up and Down Arrows to navigate Previous and Next screens option are both enabled, the user will not be able to use the arrow keys to navigate. Note: This will prevent the user from accidentally changing the selected response.
|
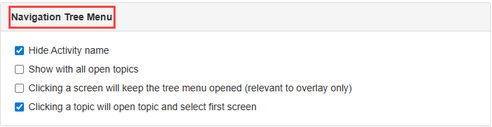
| 8. | On the Navigate Tree Menu pane, click the corresponding checkbox to enable the desired options. Note: These options control the appearance and behaviour of the interface (viewer) navigation tree. |
Option
|
Description
|
Hide Activity name
|
When this option is enabled, the activity name will not display in the navigation tree.
|
Show with all open topics
|
When this option is enabled, all topics will display in their expanded form in the navigation tree.
|
Clicking a screen will keep the tree menu opened (relevant to overlay only)
|
When the interface (viewer) uses a hideable overlay for the navigation tree, enabling this option will keep the overlay open when the user interacts with the screen content.
|
Clicking a topic will open topic and select first screen
|
When this option is enabled, clicking a topic in the navigation tree will expand the topic and navigate the user to the first topic screen.
When disabled, clicking a topic will only expand the topic.
|
| 9. | On the Questions pane, click the corresponding checkbox to enable the desired options. Note: These options control the interface (viewer) settings for question screens. |

Option
|
Description
|
Always randomize choices
|
When this option is enabled, the Text Options on Question screens will always be randomized by the interface (viewer).
|
Always randomize 2.57 drop down choices
|
When this option is enabled, the Option Choices drop-down menu items on 2.57 Question screens will always be randomized by the interface (viewer).
|
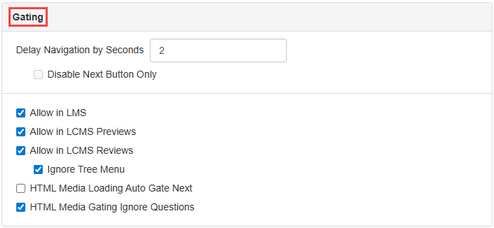
| 10. | On the Gating pane, enter a value in seconds in the Delay Navigation by Seconds field and click the corresponding checkbox to enable the desired options. Note: These options control the user progression through activities in the LCMS and LMS. Gating is designed to prevent users from rapidly clicking through all screens in an Independent Study activity. |
Option
|
Description
|
Delay Navigation by Seconds
| • | Disable Next Button Only |
|
When a value is entered in this field, user navigation (moving to next screen) is restricted until the specified seconds have elapsed.
|
When the Disable Next Button Only option is enabled, only the Next button will be disabled until the specified delay passes. The Previous button will be available immediately.
|
Allow in LMS
|
When this option is enabled, gating will be applied to the published activity when the activity is launched in an LMS.
|
Allow in LCMS Previews
|
When this option is enabled, gating will be applied to the activity previews in the LCMS. Note: Disabling this option will make viewing an activity easier for developers.
|
Allow in LCMS Reviews
|
When this option is enabled, gating will be applied to review previews in the LCMS.
|
When the Ignore Tree Menu option is enabled, the navigation tree will not be gated during review previews. Note: Reviewers will be able to move easily between screens and topics.
|
HTML Media Loading Auto Gate Next
|
When this option is enabled, the Next button will be automatically disabled when HTML media is loaded. Note: Media assets may have code to enable the Next button but not the code to disable the Next button. Using this option will automatically disable the Next button in the viewer, when loading HTML media.
|
HTML Media Ignore Questions
|
When this option is enabled, and the media has code to disable navigation, the code will be ignored when the HTML media is on a question screen.
|
| 11. | On the SCORM pane, click the corresponding checkbox to enable the desired options. Note: These options control how SCORM data is saved by the interface (viewer). These options will only apply when the activity is launched in the LMS. |

Option
|
Description
|
Set exit to suspend until completion status is completed
|
When this option is enabled, the user's place in the activity is retained when they close the interface (viewer) window and the activity is not completed. Note: When the activity is completed and relaunched, the activity will open to the first screen.
|
Always set exit to suspend
|
When this option is enabled, the user's place in the activity is always retained when they close the interface (viewer) window.
|
Only call Terminate when closing the window
|
When this option is enabled, the communication with the LMS will only be terminated when the viewer window is closed.
When this option is not enabled, the viewer will terminate communication when the activity is complete.
|
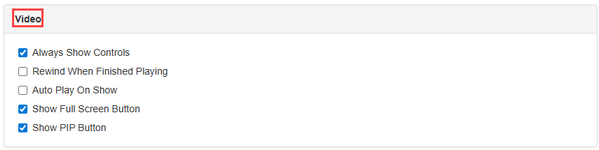
| 12. | On the Video pane, click the corresponding checkbox to enable the desired options. Note: These options control how the videos are displayed in the interface (viewer). |
Option
|
Description
|
Always Show Controls
|
When this option is enabled, the player control bar at the bottom of the video will always appear.
When this option is disabled, the player control bar at the bottom of the video will only show on mouse over.
|
Rewind When Finished Playing
|
When this option is enabled, the play head will move to the beginning of the video when the video ends.
When this option is disabled, the play head will stay at the end of video. This is the default option for the play head.
|
Auto Play On Show
|
When this option is enabled, the video is shown on screen and will start playing right away.
When this option is disabled, the video is paused at the beginning and the user must click the play button. This is the default option for videos.
|
Show Full Screen Button
|
When this option is enabled, the full screen button will display on the player controls to show the video in full screen mode.
When this option is disabled, the full screen button will not display.
|
Show PIP Button
|
When this option is enabled, the picture-in-picture (PIP) button will display on the player controls to show a pop out of the video that can be dragged around the monitor.
When this option is disabled, the PIP button will not display.
|
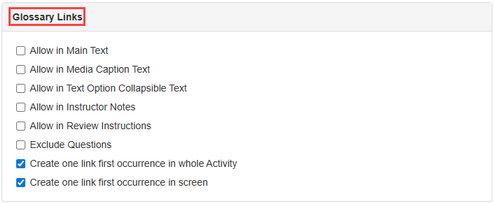
| 13. | On the Glossary Links pane, click the corresponding checkbox to enable the desired options. Note: These options control glossary link behaviour. |
Option
|
Description
|
Allow in Main Text
|
When this option is enabled, glossary links will display in the main text.
|
Allow in Media Caption Text
|
When this option is enabled, glossary links will display in the media caption text.
|
Allow in Text Option Collapsible Text
|
When this option is enabled, glossary links will display in collapsible text.
|
Allow in Instructor Notes
|
When this option is enabled, glossary links will display in instructor notes.
|
Allow in Review Instructions
|
When this option is enabled, glossary links will display in review instructions.
|
Exclude Questions
|
When this option is enabled, glossary links will not display in questions.
|
Create one link first occurrence in whole Activity
|
When this option is enabled, a glossary term will only be linked on its first occurrence in the activity.
|
Create one link first occurrence in screen
|
When this option is enabled, a glossary term will only be linked on its first occurrence on the screen.
|
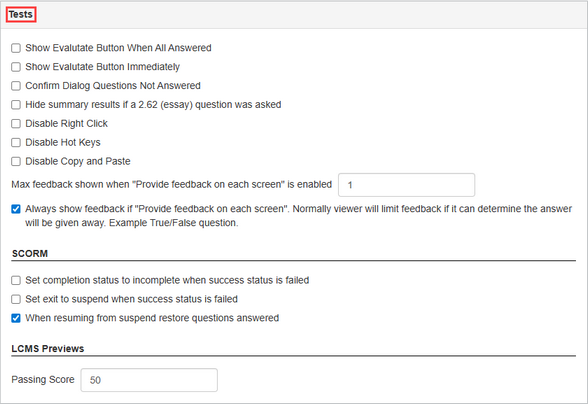
| 14. | On the Tests pane, click the corresponding checkbox to enable the desired options. Note: These options control interface (viewer) behaviour for Test activities. The SCORM options control how SCORM data is saved by the interface (viewer). SCORM options will only apply when the activity is launched in the LMS. |
Option
|
Description
|
Show Evaluate Button When All Answered
|
When this option is enabled, the Evaluate button will display once the user has answered all the questions. The user clicks the button to obtain a score for the test.
When this option is disabled, the Evaluate Button will display on the last question. The user does not have to answer the questions to see the button. This is the default option.
|
Show Evaluate Button Immediately
|
When this option is enabled, the Evaluate button will display at the beginning of the test and remain on screen.
When this option is disabled, the Evaluate button will display on the last question. This is the default option.
|
Confirm Dialog Questions Not Answered
|
When this option is enabled, if the user clicks the Evaluate button but does not answer all the questions a Yes/No window will display asking the user if they still want to evaluate the test. The user can click No and navigate through the test to answer each question. If the user clicks Yes, the unanswered questions are scored as incorrectly answered.
When this option is disabled, if the user clicks the Evaluate button but does not answer all the questions, the unanswered questions are scored as incorrectly answered.
|
Hide summary results if a 2.62 (essay) question was asked
|
When this option is enabled, the exam summary results screen is hidden if the exam contains a 2.62 (essay) question. Note: This is because the exam will have to be graded manually.
|
Disable Right Click
|
When this option is enabled, the user will not be able to right click in a Test activity. Note: Enabling this option helps prevent cheating. The user will not be able to view the page source.
|
Disable Hot Keys
|
When this option is enabled, the user will not be able to use keyboard shortcuts in a Test activity.
|
Disable Copy and Paste
|
When this option is enabled, the user will not be able to copy and paste in a Test activity. Note: Enabling this option helps prevent cheating on 2.62 (essay) questions. The user will not be able to copy/paste responses.
|
Max feedback shown when "Provide feedback on each screen is enabled"
| • | Always sow feedback if "Provide feedback on each screen". Normally, viewer will limit feedback if it can determine the answer will be given away. Example True/False question. |
|
When the Provide feedback on each screen option is enabled in a Test activity, the value entered in this field represents the number of times the user is provided incorrect feedback on a question before they can navigate to the next screen. Note: The user will be given the specified number of attempts to correctly answer the question before they can navigate to the next screen with the incorrect answer selected.
|
When the Provide feedback on each screen option is enabled, the user will be provided incorrect feedback each time they answer the question incorrectly.
When the option is disabled, the interface (viewer) will limit the feedback when the feedback can be used to determine the answer (i.e True/False questions).
|
SCORM
|
Set completion status to incomplete when success status is failed
|
When this option is enabled, the status of a failed Test activity will not be set to complete.
|
Set exit to suspend when success status is failed
|
When this option is enabled, the status of the failed Test activity will not be marked as complete.
|
When resuming from suspend restore questions answered
|
When this option is enabled, the interface (viewer) will retain the user response on the last question visited before closing the Test activity, when the suspended Text activity is relaunched.
|
LCMS Previews
|
Passing score
|
The value entered in this field represents the default pass score (percentage) for the Test activity (i.e. 80%).
|
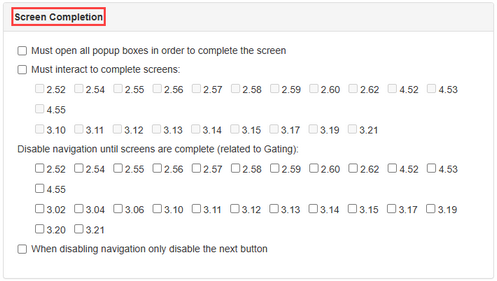
| 15. | On the Screen Completion pane, click the corresponding checkbox to enable the desired options. Note: These options control how the interface (viewer) determines if a user has completed a screen. Screen completion is used in interface (viewer) gating and other functions. |
Option
|
Description
|
Must open all popup boxes in order to complete the screen
|
When this option is enabled, screens with pop-ups will not be set to complete until all pop-ups have been opened.
|
Must interact to complete screens
|
When this option is enabled, the desired screen(s) types that require interaction will not be set to complete until all interactions have been completed by the user (i.e. text options, tabs, text build, etc.)
|
Disable navigation until all screens are complete (related to Gating)
|
When this option is enabled, the user will not be able to navigate to the next screen until the desired screen(s) has been set to complete.
|
When disabling navigation only disable the next button
|
When the Disable navigation until all screens are complete (related to Gating) option is enabled for a desired screen and the screen is not set to complete, the user will be able to navigate to the previous screen but not to the next screen.
|
| 16. | Click the Submit button to save the changes or click the Cancel button to return to the previous screen without saving. |
|