|
The Find & Replace function may be used by the Administrator, Manager, or Senior Developer to find and replace content globally.
To find and replace content globally:
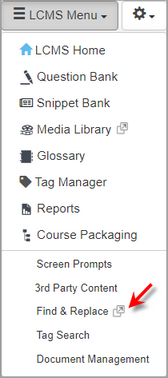
| 1. | Click Find & Replace from the LCMS Menu drop-down list or click the expand icon to display the Find & Replace window. |

| 2. | On the Find & Replace window, enter the desired content to search for in the Search For field. |
| 3. | Select the desired search option (Word or Phrase, All Words) to refine the search. |
| 4. | If desired, click the checkbox beside Case-sensitive to further refine the search. |
| 5. | Enter the desired content in the Replace With field. Note: The content entered in the Replace With field will replace the content entered in the Search For field. |
| 6. | Click the checkbox beside the desired option to include in the search from the Include Fields options. Note: If media related text fields are chosen, the Pop-Ups option should also be selected if the pop-up media text field also needs to be included in the search. Click the Select All button to include all of the options or the Select None button to exclude all of the options. |

| 7. | On the Screen Related pane, select the desired tags by clicking the Tags field to access the Select Tags window, and then click the Submit button. Note: Clicking the Clear Tags button will remove all the tags from the search. See Tags/Categories (Tab) for more information. |
| 8. | Enter the desired screen style to include in the search in the Screen Style(s) field. Note: Separate the entries by a comma (3.02, 3.10, 3.14). |
| 9. | Select the desired classification from the Classification drop-down menu or leave the field blank to include all classifications. |
| 10. | Select the desired controlled goods category from the Controlled Goods drop-down menu or leave the field blank to include all controlled goods categories. |
| 11. | Enter the desired screen ID(s) separated by a comma in the Screen ID field. Note: When searching by screen ID no other inputs are valid. |

| 12. | On the Activity Related pane, select the desired language from the Screen Language drop-down menu. Note: This field is only available when Multilingual Support is enabled on the project. |
| 13. | Select the desired developer from the Developer drop-down menu or leave blank to include all developers in the search. |
| 14. | Select the desired activity status from the Activity Status drop-down menu or leave blank to include all activity statuses in the search. |
| 15. | Select the desired activity development phase from the Activity Development Phase drop-down menu or leave blank to include all activity development phases in the search. |
| 16. | Enter the desired activity version in the Activity Version field and select the desired option Include Activities at Version or Exclude Activities at Version. |

| 17. | Click the Find button to begin the search. Note: The search may take a few moments to complete. |
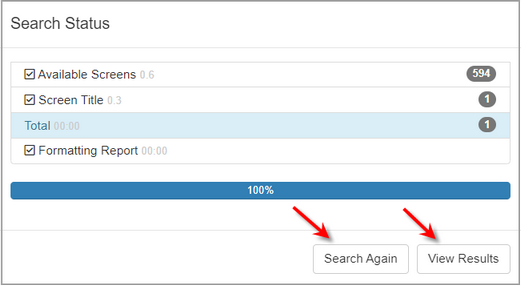
| 18. | On the Search Status window, click the View Results button to display the list on the Find & Replace screen or click the Search Again button to repeat the search. |

| 19. | On the Find & Replace screen, click the Change icon beside the desired list item to review the requested change on the Replace window. Note: Locked fields require a manual change. |

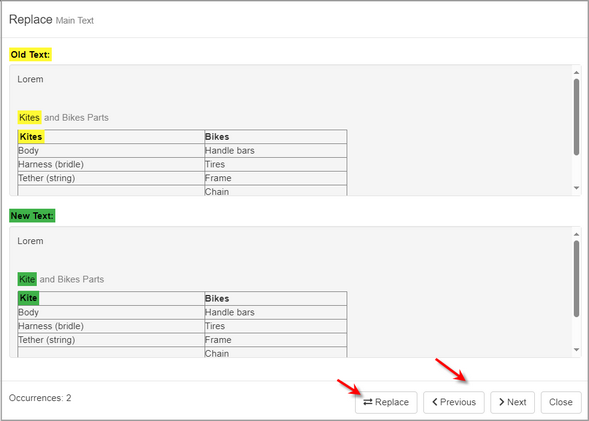
| 20. | On the Replace window, click the Replace button to replace the highlighted old text with the highlighted new text. Note: When clicked, the Replace button changes to an Undo button, allowing the user to immediately undo the replace function. The Undo button is no longer available once the user clicks the Previous, Next or Close button. Note: A checkmark displays in the line item checkbox, when the text is replaced. |
| 21. | Click the Previous or Next button to view additional occurrences. |
| 22. | Click the Close button to return to the Find & Replace screen. Note: A checkmark displays beside the list item when the content has been replaced. |

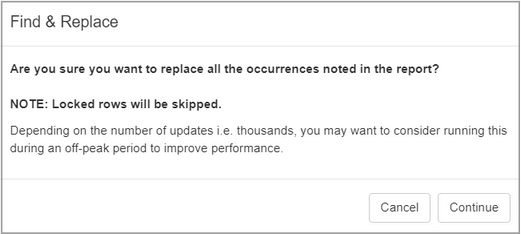
| 23. | On the Find & Replace screen, click the Replace All button to replace all the listed content at once. A confirmation window displays when the Replace All button is clicked. |
| 24. | On the Find & Replace confirmation window, click the Continue button to execute the Replace All function for all occurrences listed or click the Cancel button to return to the Find & Replace screen. Note: If a large amount of content requires replacing, consider performing this function during an off-peak period. |

| 25. | On the Find & Replace screen, click the View icon to view the corresponding screen. |

|