| 1. | In the Main Text field, click the pencil icon to open the HTML editor. |
| 2. | Click the Table icon in the top row. |

| 3. | When the Table Properties window opens, enter the desired number of rows in the Rows field. Enter the desired number of columns in the Columns field. Note: To insert or delete rows or columns in an existing table, right-click on the table and select the desired action from the list. You can also insert, delete or merge cells and delete the table. |
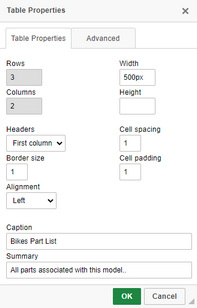
| 4. | Enter the desired width and height of the table in the Width and Height fields. Note: The table will automatically adjust to the content if these fields are left blank. The column width can also be adjusted by dragging to the desired width. |
| 5. | Select the desired header option (None, First Row, First Column or Both). |
| 6. | To insert a border around the table, enter the desired border size in the Border Size field. Note: No border displays when the field is left blank. |
| 7. | To insert cell padding and spacing for the table cells, enter the desired cell padding/spacing in the Cell padding and Cell spacing fields. |
| 8. | Select the text alignment within the cells from the Alignment drop-down menu (Left, Center or Right). |
| 9. | Enter a table title in the Caption field. Note: The table caption displays at the top of the table. |
| 10. | Enter a brief description of the table content in the Summary field or leave blank. Note: This field does not display in the Main Text field. |
| 11. | Click OK to save. Note: Right-click on the table and select Table Properties to view or modify the table properties. |
| 12. | Click the Advanced tab to assign an Id and Stylesheet Class attribute that can be used in a specified CSS stylesheet. Additionally, you can assign the language text direction from the Language Direction drop-down menu (Left to Right or Right to Left). |
|