|
To schedule the automated import of LDAP users:
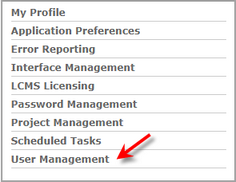
| 1. | Click the User Management link on the LCMS Home screen to open the User Management screen. |

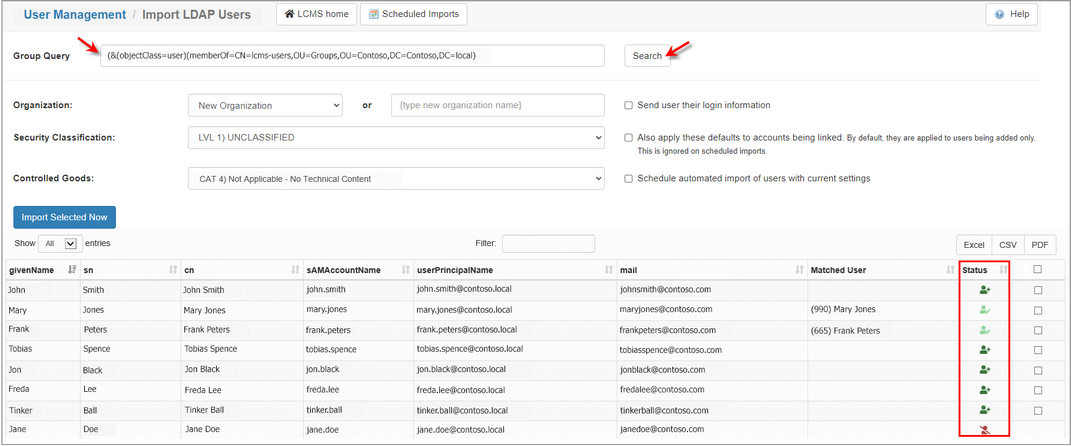
| 2. | On the User Management screen, click the Import LDAP Users button to open the Import LDAP Users screen. |

| 3. | On the Import LDAP Users screen, modify the Group Query field or use the default value, and then click the Search button. Note: All users on the LDAP server that match the Group Query entry will display in a list. In the Status column next to each user, an icon will depict the user’s LCMS status: |
| • |  This icon displays when a user has not been added to the LCMS. This icon displays when a user has not been added to the LCMS. |
| • |  This icon displays when a user with a matching first and last name, or email address exists in the LCMS. It could also mean the user exists but their information has been updated. Note: When these users are selected, they will link to the existing LCMS account. This icon displays when a user with a matching first and last name, or email address exists in the LCMS. It could also mean the user exists but their information has been updated. Note: When these users are selected, they will link to the existing LCMS account. |
| • |  This icon displays when a user exists in the LCMS. This icon displays when a user exists in the LCMS. |

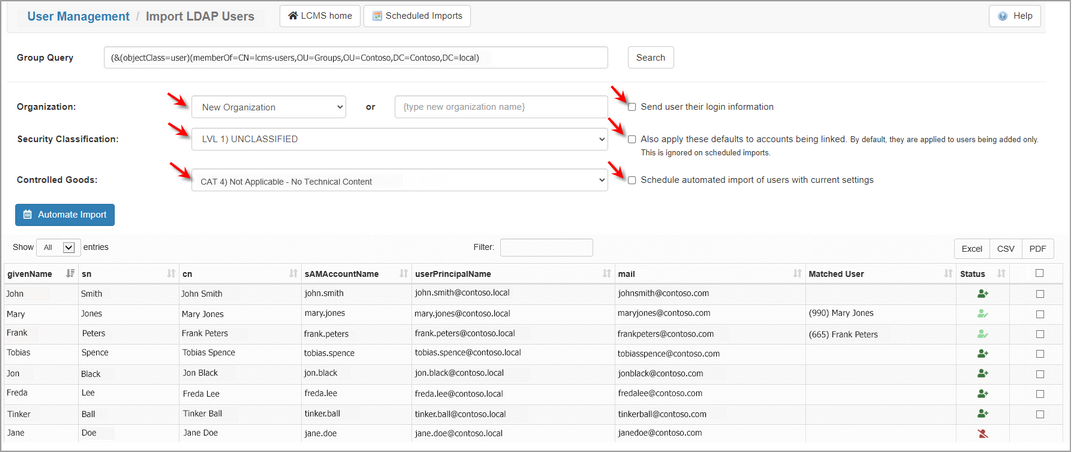
| 4. | Select a default from the drop-down menu for the Organization, Security Classification, and Controlled Goods fields. These defaults will be applied to the imported users. |
| 5. | Click the checkbox beside Send user their login information to email the imported users their LCMS login (optional). |
| 6. | Click the checkbox beside Also apply these defaults to accounts being linked to apply the defaults to existing LCMS users that are being linked to LDAP accounts (optional). Note: If this is not selected, the users will retain their assigned Organization, Security Classification, and Controlled Goods. |
| 7. | Click the Schedule automated import of users with current setting checkbox to open the schedule import pane. |

| 8. | On the schedule import pane, enter the desired import name in the Import Name field, if required. Note: This field may be used as a reference when multiple imports are scheduled. |
| 9. | Select the desired frequency (Daily, Weekly or Monthly) for the import by clicking the corresponding radio button in the Frequency field. |
| 10. | Select the desired start date and time for the import by using the calendar widget in the Start Date/Time field. Note: When Weekly or Monthly is chosen, the subsequent imports will occur on the same day of the week and time. |
| 11. | Enter the desired email address in the Email field to send the email recipient notifications about the automated imported (optional). Note: The scheduled import will display on the Scheduled LDAP Imports list. |

| 12. | Click the Automate Import button to schedule the import and open the Scheduled LDAP Imports screen to display a list of scheduled LDAP imports. Note: On the Scheduled LDAP Imports screen, you may edit, delete or run the scheduled LDAP import by clicking the corresponding icon in the last column. |

|