Thumbnail
|
Description
|

|
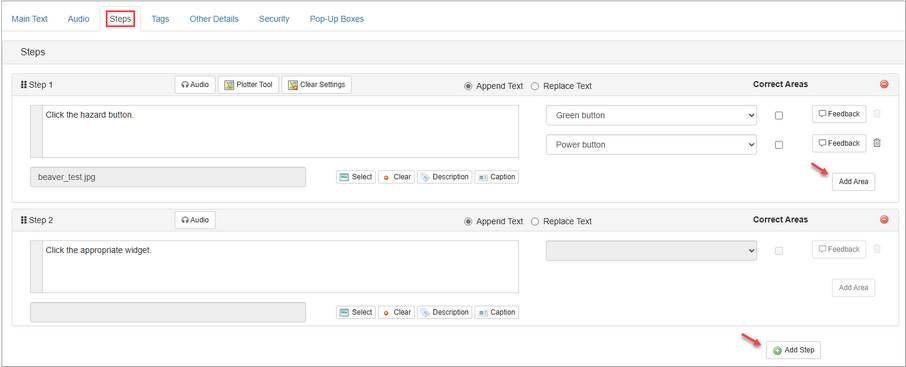
4.53 Image Step Builder. User clicks hotspots on media to completed a sequence of steps. Up to 25 steps Text may be appended or replaced as required for each step. Users may be provided feedback as they progress.
|
Screen style 4.53 enables the developer to plot areas for hot spots on the image. The user clicks the hot spots in the viewer to complete a series of steps. As the user interacts with the image, the main text is appended or replaced. Note: This screen may also be used as an Instruction screen.
| 1. | In addition to the standard question-screen fields, screen 4.53 has a Steps tab with multiple step fields, numbered one to twenty-five. To reorder the step fields, use the drag-handles (top-left of field). Each step field, may contain an image with text and/or audio inputs. The text inputs may be set to append or replace the previous text inputs. Each step field may also include correct/incorrect clickable areas with user feedback. Note: If an audio file is required, click the Audio tab to select the default audio file. See Audio Tab for more information. |
| 2. | Enter the desired text in the text input field. Note: If an audio file is required, click the Audio icon and select the audio file. |
| 3. | Click the Select button to open the Media Library and select the desired media file. Note: Only images that are compatible with the Plotter Tool can be used on this screen. |
| 4. | Click the Plotter Tool button to plot correct/incorrect areas on the media. See Plotter Tool for more information. |
| 5. | On the Correct Areas pane, click the drop-down menu, and then select the desired correct/incorrect area from the media. Click the checkbox beside the listed area, if the area is a correct area. Leave it unchecked if the listed area is not the correct answer. Note: If there are more than one correct actions in a step, the user must correctly identify all areas before they can move on to the next step or next screen. |
| 6. | Click the Feedback button to the right of the listed area to provide individualized, tailored feedback (up to five) for the user's incorrect responses. When the button is clicked the Feedback window displays. |

| 7. | On the Feedback window, enter the desired text in the Feedback 1 field. |
| 8. | Click the Add More Feedback button to insert additional Feedback fields, if required. A maximum of five Feedback fields may be inserted. Note: The Feedback fields may be reordered using the drag-handles (top-left of field) or deleted by clicking the corresponding delete button. |
| 9. | Click the Submit button to save the changes and return to the previous screen or the Cancel button to return to the previous screen. |

| 10. | On the Correct Areas pane, click the Add Area button to insert additional plotted correct/incorrect areas and feedback fields, if required. |
| 11. | Click the Add Step button at the bottom of the screen to add additional steps. |
| 12. | Click the Save button to save the changes. |
|