|
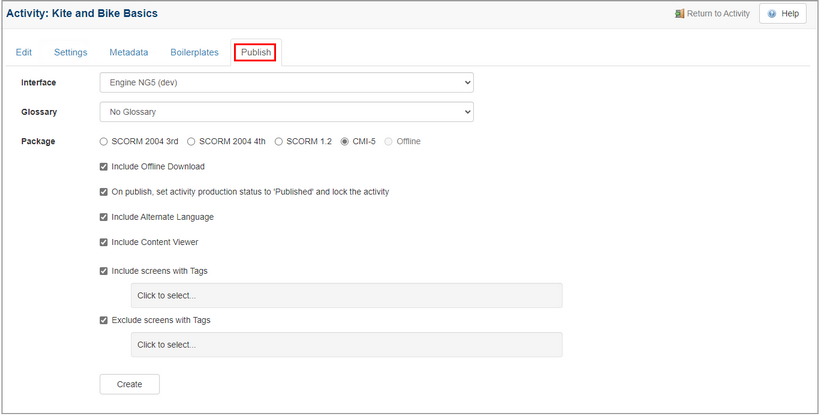
Courses can be published from within an activity by following the steps below.
| 1. | Click Publish as Course from the Additional Options menu. |
| 2. | The Course Designer opens on the Publish tab. Note: Click the Settings tab and modify the Course Code and Course Description fields if required. You may also add and edit course details and structure. For more information see Course Designer. |

| 3. | On the Publish tab, select the desired interface from the Interface drop-down menu. |
| 4. | Select the desired glossary from the Glossary drop-down menu, if required. |
| 5. | Select the desired package type SCORM or Offline. Note: When one of the SCORM option is selected, click the Include Offline Download checkbox to include the offline course in the SCORM package. This function wraps the course, making it SCORM conformant for delivery via a SCORM conformant LMS. |
| 6. | Click the On publish, set activity production status to 'Published' and lock the activity checkbox, if required. Note: This will change the status of the activity to published and lock the activity. |
| 7. | Click the Include Alternate Language checkbox, if required. Note: Multilingual Supports must be enabled in Project Preferences for this checkbox to display. |
| 8. | Click the Include Content Viewer checkbox to include the content viewer, if required. |
| 10. | Click the Include screens with Tags checkbox, choose the tags from the Select Tags window and then click the Submit button (if required). |
| 11. | Click the Exclude screens with Tags checkbox, choose the tags from the Select Tags window and then click the Submit button (if required). |
| 12. | Click the Create button to create your SCORM or Offline package. |

| 13. | After a few minutes, the package will been created. |
| 14. | Click the course link to download the SCORM package. When the file is downloaded, save the file in the desired location. Note: Now that you have wrapped the desired course in a SCORM package and downloaded it, it is available for import into the LMS. This import is done from within the LMS. |

| 15. | Click Return to Activity when you have finished publishing your course. |
|