| 1. | On the LCMS Home screen, click the Application Preferences link to open the Application Preferences screen. |
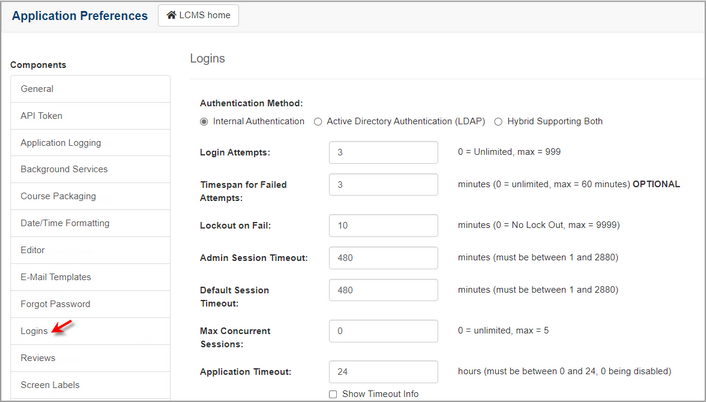
| 2. | On the Application Preferences screen, click the Logins tab from the Components menu to open the Logins pane. |

| 3. | On the Logins pane, select an Authentication Method by clicking the radio button beside the option Internal Authentication, Active Directory Authentication (LDAP) or Hybrid Supporting Both. The three methods allow customization of the maximum number of login attempts, number of failed attempts and the failed attempt lockout period. Session and application timeouts are also customizable. Note: To enable Active Directory Authentication (LDAP) or Hybrid Supporting Both, a Lightweight Direct Access Protocol (LDAP) server must be configured and the administrator must have the credentials for query access on the LDAP server. When either Active Directory Authentication (LDAP) or Hybrid Supporting Both is chosen, administrators will be able to import users from the LDAP server. See Import LDAP Users. |
| 4. | Enter the desired maximum number of failed login attempts (up to a maximum of 999) a user is permitted before being temporarily locked out of the system in the Login Attempts field. If the field is set to 0, users will have unlimited login attempts. |
| 5. | The Timespan for Failed Attempts field is optional. This field determines the timespan for consecutive failed login attempts to be considered. Entering a value of 1 to 60 minutes indicates the desired timespan to check for failed login attempts prior to the current failed login attempt. If 0 is entered in this field, all previous failed login attempts will be considered in determining if the account should be locked. |
| 6. | Enter the desired lockout period (up to a maximum of 9999 minutes) for failed logins in the Lockout on Fail field. This determines how long a user must wait to try logging in again after exceeding the maximum number of failed login attempts. If the field is set to 0, no lockout occurs after users exceed the maximum number of failed login attempts. |
| 7. | Enter the desired session timeout period (up to a maximum of 2880 minutes) in the Admin Session Timeout field. This indicates how long administrators will remain logged in to the LCMS without user interaction. |
| 8. | Enter the desired session timeout period (up to a maximum of 2880 minutes) in the Default Session Timeout field. This indicates how long the LCMS will remain logged in without user interaction. |
| 9. | Enter the desired maximum number of concurrent logins a user is permitted to have (up to a maximum of 5) in the Maximum Concurrent Sessions field. Note: If 0 is entered in this field, the user is permitted an unlimited number of concurrent logins. |
| 10. | Enter the desired application timeout period (up to a maximum of 24 hours) in the Application Timeout field. This indicates how many hours a user may remain logged into the system before they have to verify their credentials again. If the field is set to 0, applications timeouts will be disabled. |
| 11. | Click the Show Timeout Info checkbox to have the application timeout information display in the header. Note: The application timeout information will not display in the header if the Application Timeout field is set to 0. |
|