|
The Plotter Tool also allows text labels to be superimposed on static graphic media assets on the following screen styles:
| • | 3.04 Panoramic Media Above |
| • | 3.06 Panoramic Media Below |
| • | 3.10 Media with Highlights |
| • | 3.11 Media with Hotspots |
| • | 3.18 Media and Text Stacked |
| • | 3.19 Media and Text Build |
| • | 3.20 Media and Text Grid |
| • | 2.52 Multiple-choice with Media |
To add a label, follow these steps:
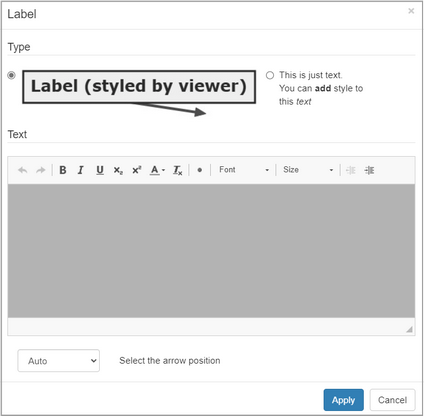
| 1. | Click the Draw button, then click the New Label button at the bottom of the Plotter Tool. The Label window will open. |

| 2. | Click the radio button beside This is just text to create text for text that you can style manually or choose the radio button beside Label (styled by viewer) for text that will appear within a pre-styled box, with an arrow attached. Note: If the Label (styled by viewer) option is selected, you will also be able to select the desired arrow position (Auto, Top, Right, Left or Bottom) from the Select the arrow position drop-down menu. Auto is the default setting. |
| 3. | Enter the text in the HTML editor field. Note: For plain text, you can style using bold, italics, underline, font colors, font style and font size. However, for pre-styled labels, these toolbar buttons will not be available. See Configure Plotter Tool for more information about the Plotter Tool labels. |
| 4. | Click Apply to apply your changes and close the window or Cancel to exit without applying changes. If you apply the changes, the label will be superimposed on your graphic. Note: When labels are added to an image using the Plotter Tool an identifier (lesson, quiz or instructor led) is also added. However, if the screen can belong to various activity types the identifiers are no longer valid. |
| 5. | Click the Select button at the bottom of the Plotter Tool and then click on the text label to drag and position it on the graphic. |
| 6. | Click the arrow (the line, not the arrowhead) and drag points will appear at either end of the line. You can drag these to reposition both ends of the arrow. |

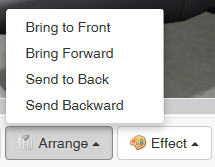
| 7. | Click the Arrange button to bring up a menu that will allow you to send a label backward/forward or to the front or back. |
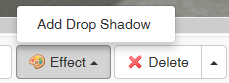
| 8. | Click the Effect button to toggle a drop shadow on or off. |
|